Geyser Installation Can Be Fun For Everyone
Wiki Article
The 8-Minute Rule for Geyser Installation
Table of ContentsThe 6-Minute Rule for Geyser InstallationThe Best Guide To Geyser Installation3 Simple Techniques For Geyser InstallationThe Definitive Guide to Geyser InstallationThe Basic Principles Of Geyser Installation
Vertical geysers are various although much of the description still applies. The same general policies apply as above, yet the outlet and T&P shutoffs need to be at the extremely leading of the geyser.
Permit sufficient room beneath to permit the changing of the thermostat and component. I believe that there is a better temperature level differential in a vertical geyser - simply put the thermostat is a pair of degrees cooler than the outlet water. I tend to turn the thermostat down a little bit much more because of this.
I am not around to tell you exactly how to set up a geyser. Once again - that's what assists to pay my bond! The intent of this page is to notify you, for security what you ought to and also must not see if you happen to stick your head right into the ceiling area to look into your geyser.
Some Known Details About Geyser Installation
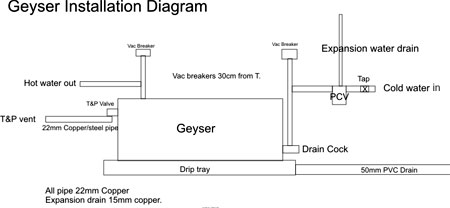
I will certainly explain the common basic demands of a noise, modern high stress, horizontal installment. The complying with summary associates with a modern-day high pressure (400/600Kpa) system commonly made by Kwikot South Africa as well as others. Flat placed 150 or 200 litre devices are without a doubt one of the most common in contemporary domestic setups.Realize that the components are NOT compatible in between the two unique systems - High stress and also Low stress! It is feasible to get rid of an old low stress system and replace it with a contemporary high pressure system nonetheless - you purchase a brand-new high stress geyser and install it according to the current specification. geyser installation.
The exact same policies use but there are some special factors to consider described at the end - with a diagram. Here is what you need to see (in no certain order): The most evident point that you must see immediately. The hot spring beings in a tray made of plastic (commonly red) or tin plate.
An Unbiased View of Geyser Installation
Because June 2001, the drip tray is not optional - its got to be there and there has to be a drainpipe pipeline for it! The drainpipe is a 50mm PVC waste pipe that drains pipes the tray by piping the water out the home.The following most visible attribute would be the. These are tiny brass components installed at the end of a 30cm length of pipeline. They 2 vacuume breakers stand vertically concerning 30cm above the hot spring. These are necessary. They quit the water siphoning out the geyser when the cool supply is stopped.
It can be suggested that this is the main feature yet I do not see it. Bear in mind that vacuume breakers are a reasonably new demand - there are still hundreds of old HP systems out there without vacume breakers as well as I am yet to see one collapse. geyser installation. Even if I haven't seen it does'nt suggest it's not happening nevertheless! It is additionally most likely to occur in a multi tale structure because the siphon can attract a more powerfull vacuume.
Rumored Buzz on Geyser Installation
The cool water side is the side that straight connects to the drain penis and also goes into the geyser near the bottom. After the closed off valve you would typically discover a (PCV). There are a number of different kinds. Mostly made from brass however some are made of plastic. You ought to notice a overflow pipeline linked to the PCV that causes the exterior of the structure.Do not panic if you can Recommended Reading not find the PCV alongside the hot spring - it might be installed up to 10m away, often in an extra available position on a wall surface exterior. Sometimes it remains in a little plastic box outside., recognized as the safety valve (T&P Valve) installed on the hot spring in the direction of the top, frequently on the opposite side to the drainpipe dick.
This valve needs to have a metal (copper or steel) pipeline attached to it as well as the pipeline should lead straight out the building. This air vent pipeline is a crucial safety feature of the entire system. It should be constructed from copper or steel - NOT plastic. The pressure score on this valve have to match the pressure score on the geyser.
Some Known Details About Geyser Installation
A minimum of 2 supports under the "feet" of the geyser. click here for more info If it looks unstable get a plumber to inspect it out. Nothing like read this article a complete (warm) hot spring on the cooking area table to get everybody talking:--RRB-. Please note that all 200 litre Kwikot geysers are. The feet are not made to sustain the weight! You can wall place the 150 liter devices.This was not a requirement on old geysers, but it is currently and also its worth fitting one. The geyser has to be earthed! I have actually seen numerous geysers with the planet cord unconnected. All the copper pipes must also be earthed and bound to the hot spring earth. This is not an unimportant safety measure! Obtain a certified electrical contractor to inspect your installment if the bonding is missing out on or looks evade!! Electocution in the shower is constantly unpleasant! There should be a over the thermostat and aspect.
There are essentially just 2 main thermostat kinds - the contemporary round "Kwiktherm" in more recent Kwikot geysers and the VK (rectangle-shaped block) type in older hot springs and in some newer non-Kwikot units. The hot spring may be fed (chilly water) with polcop (plastic) pipeline - up to the shut down shutoff, yet the pipeline into and out of the hot spring should be copper or gavanised steel.
Report this wiki page